
CH32V203 with Rust and Embassy
Getting SDI print working on the CH32V203C8T6 turned into more trouble than it was worth, so I switched to plain old UART for debug output instead. This post covers the full toolchain setup for Rust and Embassy on the CH32V2 series, getting the WCH-Link recognized correctly on Windows, and a minimal program
CH32V203 Debug Logging: UART Instead of SDI Print
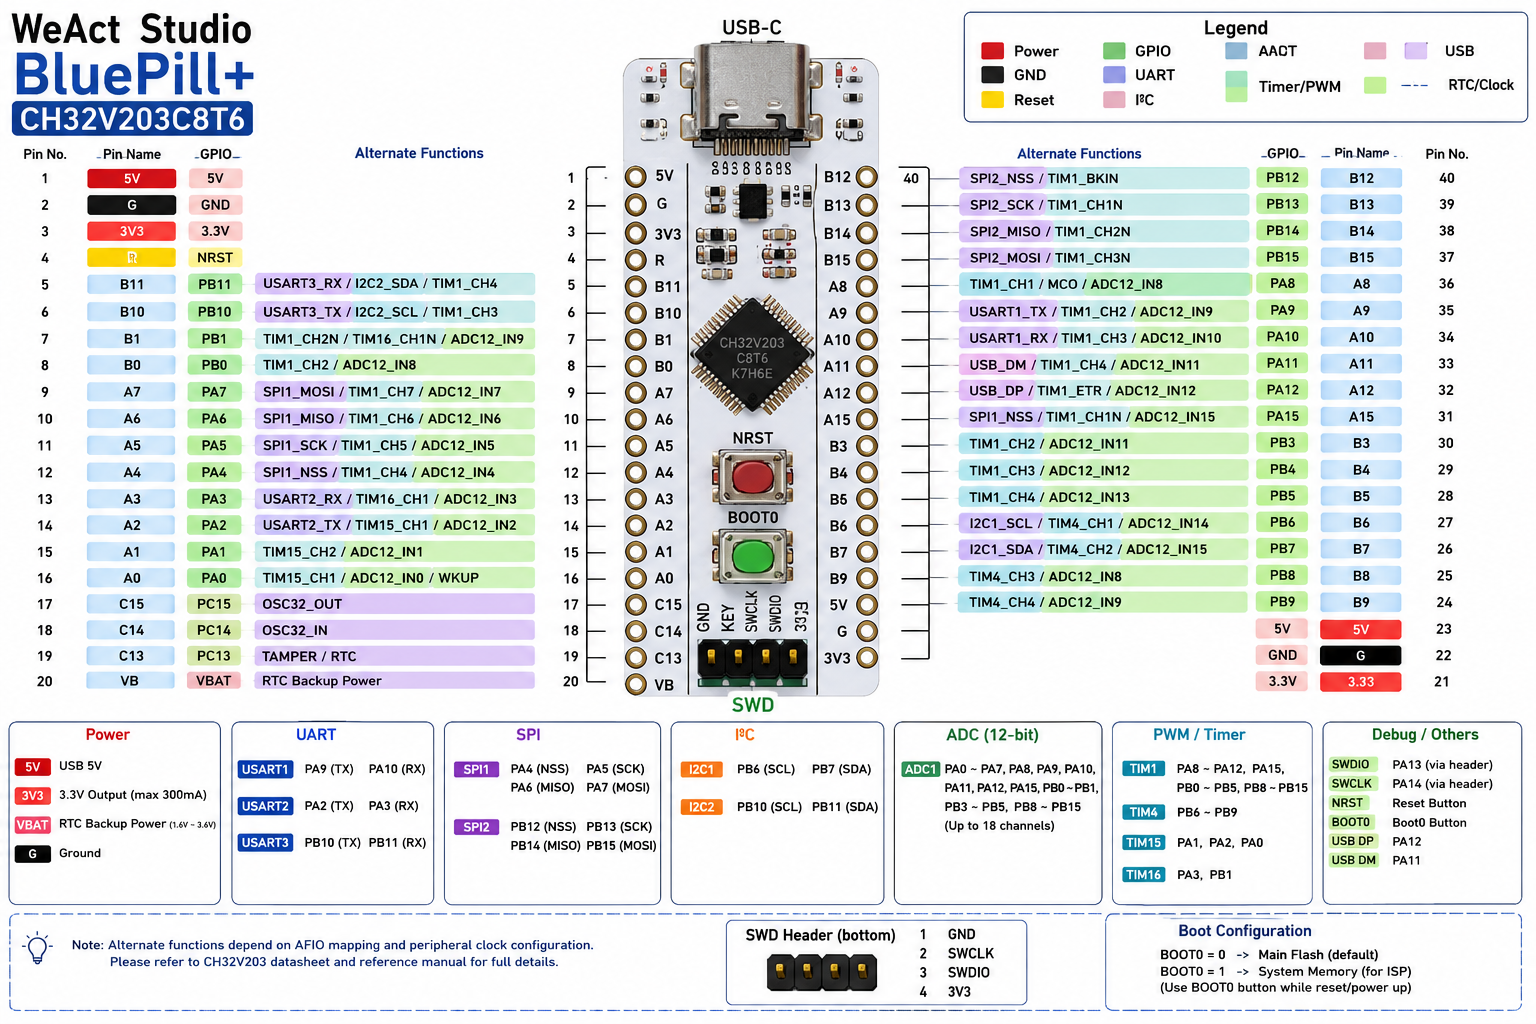
SDI print is WCH’s single-wire debug output that shares the same line as the debugger. Sounds convenient, no extra wiring needed, but my CH549 WCH-Link programmer is old and just doesn’t support it. Rather than fight that, I switched to plain UART. USART1 on ‘PA9/PA10’ (is free on most CH32V203 boards), and with a WCH-Link serial pins and a terminal you get the same debug visibility with none of the hassle.
Wiring: Board to WCH-Link and USB-Serial Adapter
Here’s everything in one table:
| Board Pin | Connects To | Wire To | |
|---|---|---|---|
| SWDIO | WCH-Link | SWDIO | |
| SWCLK | WCH-Link | SWCLK | |
| 3V3 | WCH-Link | 3V3 | |
| GND | WCH-Link | GND | |
| PA9 (TX) | WCH-Link or USB-serial adapter | RX | |
| PA10 (RX) | WCH-Link or USB-serial adapter | TX | |
| GND | WCH-Link or USB-serial adapter | GND |
This image is AI generated
Toolchain Setup
Everything starts with cargo-generate for scaffolding and wlink as the flashing/debug tool for WCH’s RISC-V parts:
cargo install cargo-generate
cargo install --git https://github.com/ch32-rs/wlink
cargo generate ch32-rs/ch32-hal-template
cargo generate pulls down the ch32-hal template, which wires up the right target, linker script, and Cargo.toml dependencies for the CH32V2 family out of the box.
Fixing the WCH-Link USB Driver on Windows
The WCH-Link exposes two USB interfaces, and Windows doesn’t always bind the right driver to each one by default. wlink needs WinUSB on the debug interface to talk to the chip; if Windows has bound something else, flashing and debugging silently fail. Fixing this means reassigning drivers by hand with Zadig:
- Download Zadig.
- Go to
Options -> List All Devicesso the WCH-Link’s individual interfaces show up. - Locate WCH-Link (Interface 0) and assign it
WinUSB. - Locate WCH-Link (Interface 1) and leave/assign it
USB Serial (CDC).
| Interface | Driver | Purpose |
|---|---|---|
| Interface 0 | WinUSB | Debug/flash access used by wlink |
| Interface 1 | USB Serial (CDC) | Passthrough serial, not used for flashing |
Get this backwards and wlink won’t see the programmer at all, or will see it but fail to attach.
Binary Utilities for objcopy
Flashing tools want a raw binary, not an ELF, so cargo-binutils and llvm-tools-preview are needed to convert the build output:
rustup component add llvm-tools-preview
cargo install cargo-binutils
The Demo Firmware
The demo blinks an LED on a spawned Embassy task and writes a tick counter out over UART once a second. A small macro wraps heapless::String and core::fmt::Write to give a println!-style call without pulling in std:
src/main.rs
#![no_std]
#![no_main]

use embassy_executor::Spawner;
use embassy_time::Timer;
use ch32_hal::gpio::{AnyPin, Level, Output};
use ch32_hal::usart::{self, UartTx};
use ch32_hal::Peri;
use core::fmt::Write;
use panic_halt as _;


// println!-style macro: println!(uart, "tick {}", n)
macro_rules! println {
    ($uart:expr, $($arg:tt)*) => {{
        let mut s: heapless::String<64> = heapless::String::new();
        let _ = core::write!(&mut s, $($arg)*);
        let _ = $uart.blocking_write(s.as_bytes());
        let _ = $uart.blocking_write(b"\r\n");
    }};
}

#[embassy_executor::task]
async fn blink(pin: Peri<'static, AnyPin>, interval_ms: u64) {
    let mut led = Output::new(pin, Level::Low, Default::default());
    loop {
        led.set_high();
        Timer::after_millis(interval_ms).await;
        led.set_low();
        Timer::after_millis(interval_ms).await;
    }
}

#[embassy_executor::main(entry = "ch32_hal::entry")]
async fn main(spawner: Spawner) -> ! {
    let p = ch32_hal::init(ch32_hal::Config::default());
    let mut uart = UartTx::new_blocking(p.USART1, p.PA9, usart::Config::default()).unwrap();

    println!(uart, "UART init ok");
    spawner.spawn(blink(p.PB2.into(), 1000).unwrap());
    let mut counter: u32 = 0;
    loop {
        Timer::after_millis(1000).await;
        counter += 1;
        println!(uart, "tick {}", counter);
    }
}
Embassy An async executor and HAL for embedded Rust, allowing efficient multitasking on microcontrollers without an OS.
UartTx::new_blocking only needs the TX pin (PA9), since this is a transmit-only debug channel — no need to wire up RX unless you want to send commands back.
Building and Flashing
Build in release mode, then convert the ELF to a raw binary with objcopy:
cargo build --release
cargo objcopy --release -- -O binary demo.bin
Flash it with wlink, watching the serial output live as it comes up:
wlink talks to the external programmer (WCH-Link), which then talks to the chip over SWD
[PC] --USB--> [WCH-Link Programmer] --SWD--> [CH32V203]
./wlink.exe flash demo\demo.bin
Note: using /wlink.exe flash --watch-serial demo\demo.bin does not reset the board and the serial does not print
wchisp also works as an alternative flashing tool. You just need to connect the USB directly to the board and press the boot button before connecting the board to the computer.
wchisp skips the external programmer entirely and talks to the chip’s own USB bootloader directly — useful if you don’t have a WCH-Link
[PC] --USB (direct)--> [CH32V203 USB Bootloader] --> [CH32V203]
./wchisp.exe flash demo\demo.bin
Conclusion
SDI print looked like the convenient option, but between the USB driver and WCH-Link firmware issues it turned into a time sink.
