
Redis TimeSeries + Go + gRPC + Vue
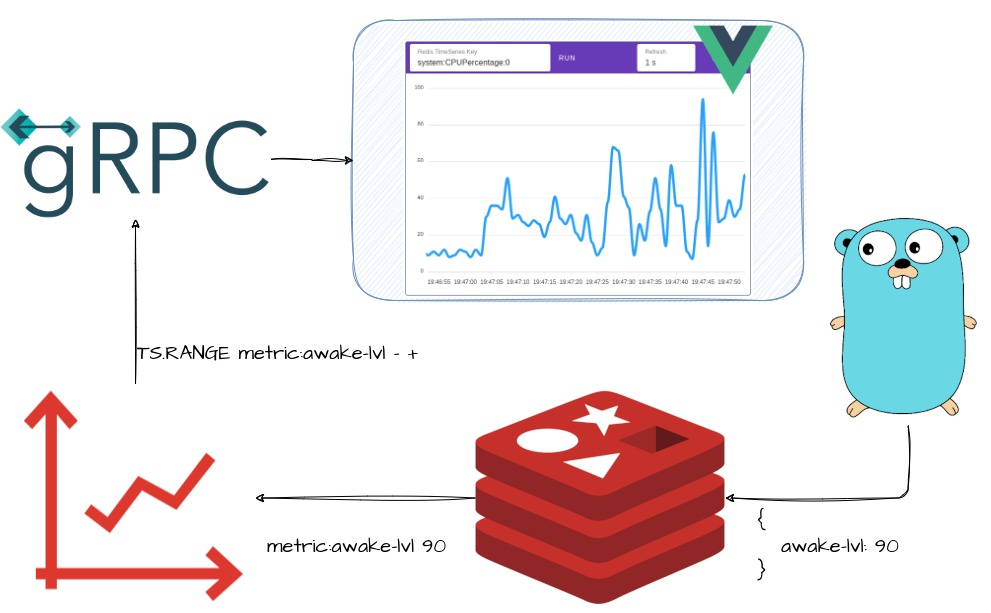
This post is complementary to the previous post of Redis TimeSeries, in which I explained the benefits of using Redis to store time series data. In comparison, instead of using Grafana to plot the data directly from Redis I will explore using gRPC-web to establish a connection between the backend written in Go and the frontend application written in Vue.
gRPC (Google Remote Procedure Call) is a modern, open source, high-performance remote procedure call (RPC) framework that can run anywhere
Features:
- enables client and server applications to communicate transparently, and simplifies the building of connected systems;
- is faster than REST+JSON communication as it uses Protobuf and HTTP/2;
- .proto file is the canonical format for API contracts
- serializes the messages on the server and client sides quickly, resulting in small and compact message payloads;
- code generation for client/server applications
- works seamlessly across various languages and platforms
The main reason that I want to use gRPC in this project is to reduce the payload size used to transport new data points when we want to plot a simple graph. But nothing is easy as it seems, gRPC is built on top of HTTP2 protocol and at this time modern browsers don’t support it. So we have to use some tricks, like using the grpc-web proxy implementation to perform conversions between HTTP1.1 and HTTP2.
Project structure
├── config
│   └── config.toml
├── docker-compose.yml
├── Dockerfile
├── internal
│   ├── config
│   │   └── config.go
│   ├── grpc_timeseries
│   │   ├── grpc.go
│   │   ├── timeseries
│   │   │   ├── timeseries.go
│   │   │   └── timeseries.pb.go
│   │   └── timeseries.proto
│   ├── metrics
│   │   ├── metrics.go
│   │   └── system
│   │       └── system.go
│   ├── redis
│   │   ├── redis.go
│   │   └── storage
│   │       └── metrics.go
│   └── router
│       └── router.go
├── main.go
└── ui
    ├── src
    │   ├── App.vue
    │   ├── components
    │   │   └── TimeSeriesChart.vue
    │   ├── main.js
    │   ├── timeseries_grpc_web_pb.js
    │   ├── timeseries_pb.js
    │   └── timeseries.proto
You can find the project in the following Github link:
https://github.com/ddavidmelo/redis-timeseries/tree/ui
Since this post is complementary to the previous post of Redis TimeSeries, I will start by describing the upgrades that I did.
Protofile
The first step is to create the struct for the .proto file:
1
2
3
4
5
6
7
8
9
10
11
12
13
14
15
16
17
18
19
20
21
22
syntax = "proto3";
package timeseries;

message DataPoint {
  int64 timestamp = 1;
  double value = 2;
}

message TimeSeries {
  string key = 1;
  repeated DataPoint data = 2;
}

message TimeSeriesRequest {
  string key = 1;
  int64 from_timestamp = 2;
  int64 to_timestamp = 3;
}

service TimeSeriesService {
  rpc GetTimeSeries(TimeSeriesRequest) returns (TimeSeries);
}
Let’s start with the body request TimeSeriesRequest. To reduce the number of points the UI will need to specify the range that it needs [from_timestamp, to_timestamp] and the key that it wants. By calling the GetTimeSeries is returned struct with a key and an array of DataPoint.
Golang backend
With the protofile created, now is possible to generate the server code that are necessary to create our gRPC server by running the following command in the folder redis-timeseries/internal/grpc_timeseries:
protoc --go_out=plugins=grpc:timeseries timeseries.proto
You may need to install the following packages before running the previous command:
sudo apt install protobuf-compiler
sudo apt install golang-goprotobuf-dev
The file timeseries.pb.go will be automatically generated, it is only necessary to adapt the GetTimeSeries method to get the metrics from Redis and prepare the TimeSeries output:
1
2
3
4
5
6
7
8
9
10
11
12
13
14
15
16
17
func (s *Server) GetTimeSeries(ctx context.Context, in *TimeSeriesRequest) (*TimeSeries, error) {
  log.Printf("Receive message from %d to %d", in.FromTimestamp, in.ToTimestamp)
  var dataPoint *DataPoint
  var dataPoints []*DataPoint

  datapoints, err := storage.RedisRange(redis.DB().RedisTS, in.Key, in.FromTimestamp, in.ToTimestamp)
  if err != nil {
    log.Error(err)
  }

  for i := 0; i < len(datapoints); i++ {
    dataPoint = &DataPoint{Timestamp: datapoints[i].Timestamp, Value: datapoints[i].Value}
    dataPoints = append(dataPoints, dataPoint)
  }

  return &TimeSeries{Key: in.Key, Data: dataPoints}, nil
}
Now that I have the method GetTimeSeries ready to handle the gRPC calls, is necessary to prepare the gRPC server:
1
2
3
4
5
6
7
8
9
10
11
12
13
14
15
16
17
18
19
20
21
22
23
24
25
26
type GrpcServer struct {
  GrpcServer    *grpc.Server
  GrpcWebServer *grpcweb.WrappedGrpcServer
}

func Grpc() *GrpcServer {
  grpcServer := grpc.NewServer()

  s := timeseries.Server{}
  timeseries.RegisterTimeSeriesServiceServer(grpcServer, &s)

  // gRPC web code
  grpcWebServer := grpcweb.WrapServer(
    grpcServer,
    // Enable CORS
    // grpcweb.WithOriginFunc(func(origin string) bool { return false }),
    // Disable CORS
    grpcweb.WithAllowNonRootResource(true),
    grpcweb.WithOriginFunc(func(origin string) bool { return true }),
  )

  return &GrpcServer{
    GrpcServer:    grpcServer,
    GrpcWebServer: grpcWebServer,
  }
}
This Grpc function will give access to the gRPC server and the gRPC-web server and also prepare the service for the previous gRPC handler function. It is also important to note that this code is set to allow all origins.
Now, let’s start the gRPC server and serve it at port 50051:
1
2
3
4
5
6
7
8
9
grpsTimeSeries := grpc_timeseries.Grpc()
lis, err := net.Listen("tcp", fmt.Sprintf(":%d", grpcPort))
if err != nil {
  log.Fatalf("Fail to listen: %v", err)
}
go func() {
  // Start Grpc Server
  log.Fatalf("Fail to serve: %v", grpsTimeSeries.GrpcServer.Serve(lis))
}()
You can now test the server using a client like Insomnia:
(Remember to load the timeseries.proto file)
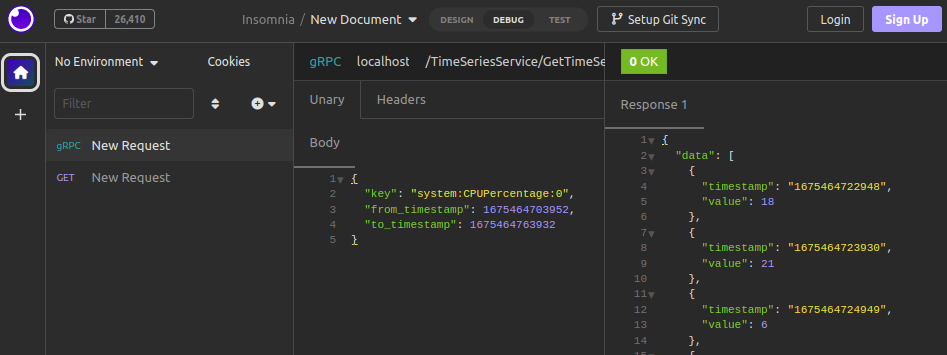
The gRPC server is done. Now is necessary to prepare the gRPC-web, which allows web clients to talk to gRPC-Go servers over the gRPC-Web spec (acts as a proxy, to intercept the HTTP 1.1 traffic and re-directing it to HTTP2). The following code is responsible for declaring the handlers for the static page, built with Vue using Gin framework, and the gRPC-Web. ServeHTTP dispatches the request to the correct handler. If the Content-Type HTTP Header matches with application/grpc-web-text, the response will be handled by gRPC-Web everything else will be handled by Gin.
1 |
|
Back to the main function, now the previously handlers are ready to be served:
1
2
3
4
5
6
grpsTimeSeries := grpc_timeseries.Grpc()
router := router.InitRouter(grpsTimeSeries.GrpcWebServer)
go func() {
  // Start HTTP Server
  log.Fatalf("Fail to serve: %v", http.ListenAndServe(fmt.Sprintf(":%d", httpPort), router))
}()
Vue frontend
With the backend completed, let’s move into the vue application:
vue create ui
cd ui
npm install --save apexcharts
npm install --save vue-apexcharts
npm install --save grpc-web
npm install --save google-protobuf
npm run serve
There are several files needed for these Vue App, so please check this folder on Github. The following commands are needed to create the gRPC client:
protoc -I=. timeseries.proto --js_out=import_style=commonjs,binary:. --grpc-web_out=import_style=commonjs,mode=grpcwebtext:.
You may need to install this package before running the previously command:
sudo npm install -g protoc-gen-grpc-web
In the TimeSeriesChart component is necessary to import the gRPC client. This is done at the top of the <script> section:
1
2
import { TimeSeriesRequest } from "@/timeseries_pb";
import { TimeSeriesServiceClient } from "@/timeseries_grpc_web_pb";
The following code represents the function responsible for doing the gRPC request:
1
2
3
4
5
6
7
8
9
10
11
12
13
14
15
16
17
18
19
20
21
22
23
24
25
grpcRequest() {
  var fromTimestamp = 0
  if (this.series[0].data.length > 1) {
    fromTimestamp = this.series[0].data[this.series[0].data.length - 1][0] + 1;
  }

  var host = window.location.protocol + "//" + window.location.host;
  const client = new TimeSeriesServiceClient(host, null, null);

  let request = new TimeSeriesRequest();
  request.setFromTimestamp(fromTimestamp);
  request.setToTimestamp(Date.now());
  request.setKey(this.redisKey);

  client.getTimeSeries(request, {}, (err, response) => {
    // handle the response
    if (err) {
      console.log(err);
    } else {
      response.getDataList().forEach((n) => {
        this.series[0].data.push(n.array);
      });
    }
  });
}
What the code does is to request all points if there are no previous points for a specific key. After that, every X time the request will specify the timestamp from the last point until now. The following diagram explains how the request is done, based on the previous code:

Next, we can build the Vue app the following command:
npm run build
or just serve it with:
npm run serve -- --port 8080
If you just want to try the App you can use docker-compose to start it:
sudo docker-compose up
When the build succeeds, open your browser and go to http://localhost:8081:

